
There are hundreds of files that are essential for WordPress to work. Some of them are more crucial than others, but few are as important as the WordPress .htaccess file. This cryptically-named file governs the way your website interacts with its server, and knowing how it works can open a lot of doors.
A few lines of code within your .htaccess file can completely change the way your website works. For example, you can use it to block specific visitors from accessing your site, redirect people towards a maintenance page, and more. That is, of course, if you know how to use it.
In this article, we’ll talk about what the .htaccess file does and how it works. Then we’ll teach you how to find, open, and edit it, with a few practical examples. We’ll even show you how to restore yours if something goes wrong. Let’s get to it!
What the WordPress .htaccess File Does

The WordPress .htaccess file is one of the so-called ‘WordPress core files’ – essential elements that WordPress requires to function. If you want to get technical, .htaccess is a configuration file that gives instructions to your server on how to serve your website’s content.
For example, you can add rules to your WordPress .htaccess file so that everyone who tries to visit your website gets redirected to a different page – just one of its many uses. Let’s talk about some other tweaks you can implement through the file:
- You can increase your max upload size. Some web hosts only enable you to upload very small files so they don’t run out of resources, which can hinder your website’s development.
- ‘Blacklist’ and ‘whitelist’ IPs from your website. When you blacklist an IP address, you block it from accessing your site altogether. Whitelisting, on the other hand, makes it so only specific IPs can get to the sections you want.
- Stop image ‘hotlinking’. If someone links to the images on your website from another page, they can use up your hosting resources and impact your site’s performance. It’s called hotlinking, and you can prevent it altogether using your .htaccess file.
- Stop people from browsing your website’s directories. If your site is unprotected, visitors can look at its file and folder structure (and potentially inside each of them), which is not something you want.
These are just a few examples, but as you might imagine, you’ll need to deal with some code if you want to implement any new features. In the next section, we’ll show you how to edit your WordPress .htaccess file safely. Then we’ll explain how to implement some of the features on your website.
How to Find and Edit Your WordPress .htaccess File
Before you can add any new features to your website using your .htaccess file, you need to know how to find and edit it safely. To do so, we’re going to use File Transfer Protocol (FTP), which enables you to access your site’s files and send them back and forth securely. You’ll need dedicated software, and we recommend using FileZilla since it’s both open-source and easy to use. Once you’ve downloaded and installed FileZilla, run it and you’ll see a few empty fields at the top of the screen, including Host, Username, and Password:

They correspond to the credentials you need to connect to your server. To find them, go to your 000Webhost control panel and look for the Settings > General screen. Inside, you’ll find a section called FTP Details near the top containing the credentials you need:
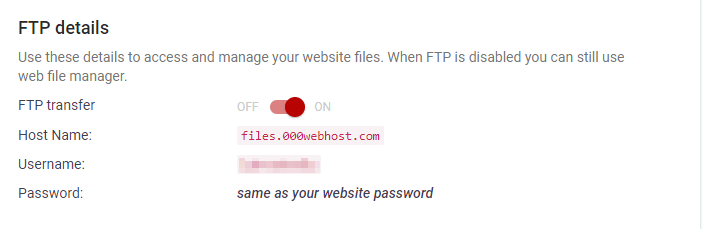
Your Host Name and Username go into the FileZilla fields that share those names, but you’ll need to use your 000Webhost account password for the third field. Once you’ve entered the credentials, click the Quickconnect button and wait for FileZilla to establish a connection. When it succeeds, a couple of folders will show up on the lower right side of the window. This displays the current contents of your web server:

For now, the only one we care about is public_html, which contains all your WordPress files and is also known as your root folder. Inside are all of the core files for WordPress. The one we’re looking for – .htaccess – is right in this directory:
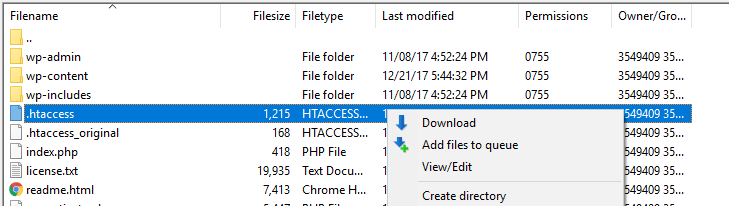
Usually this file is hidden, but to view it simply right-click the file and choose View/Edit. However, before you do, download a copy of the file by right-clicking it and selecting Download. This gives you a clean backup in case you need to rollback any changes. We can’t emphasize how important this step is, since the .htaccess file can render your website unusable if you add a faulty line of code somewhere.
When you’re ready, right-click the WordPress .htaccess file and choose the View/Edit option. This will open the file using your default text editor, and you should see something like this (at least if you’re a 000Webhost user):
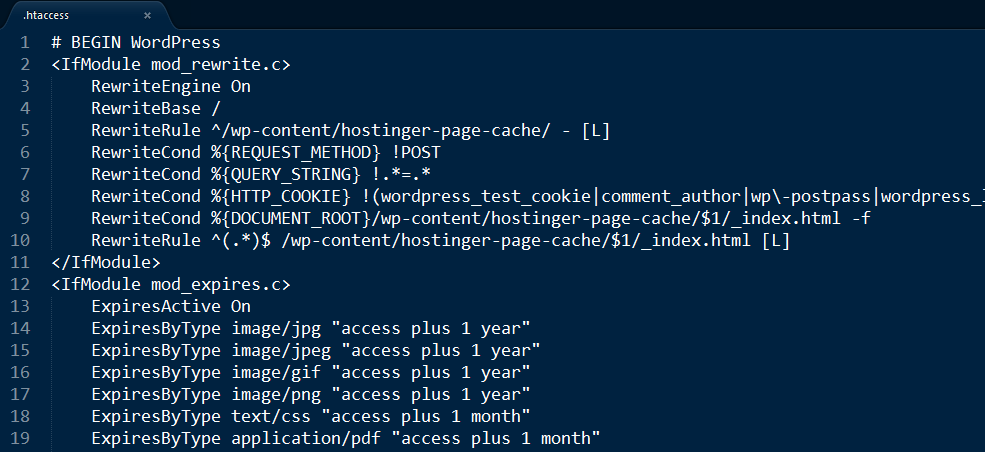
Before we go any further, it’s important you know we tweak the .htaccess file for all 000Webhost users to provide you with a better experience. The code you see above configures your website’s ‘cache’, which (in short) helps page load speeds. Here’s what a default WordPress .htaccess file looks like, so you can compare both of them:
# BEGIN WordPress
<IfModule mod_rewrite.c>
RewriteEngine On
RewriteBase /
RewriteRule ^index\.php$ - [L]
RewriteCond %{REQUEST_FILENAME} !-f
RewriteCond %{REQUEST_FILENAME} !-d
RewriteRule . /index.php [L]
</IfModule>

# END WordPress
Although we’ve added a few lines here and there, you’re also able to tweak the file further. However, any fresh code needs to go before the line reading END WordPress, otherwise, the code won’t work and your file might become corrupted (we’ll talk more about this soon).
Likewise, you’ll also want to wrap any new code snippets you add between the <IfModule mod_rewrite.c> and </IfModule> tags. Here’s a quick and dirty example:
# BEGIN WordPress
<IfModule mod_rewrite.c>
RewriteEngine On
RewriteBase /
RewriteRule ^index\.php$ - [L]
RewriteCond %{REQUEST_FILENAME} !-f
RewriteCond %{REQUEST_FILENAME} !-d
RewriteRule . /index.php [L]
</IfModule>
<IfModule mod_rewrite.c>
Your new code goes here!
</IfModule>

# END WordPress
After you make your changes, remember to save and close the file. FileZilla will then ask you if you want to update the .htaccess file on your server – you should, otherwise your changes will be lost.
In the next section, we’ll tell you how to implement several new features to your website through your WordPress .htaccess file. We’ll provide you with the code snippets you need, but it’s important you follow the rules we’ve outlined in this section to prevent any errors.
3 Useful Features You Can Add to WordPress Using Your .htaccess File
The three features below are only a few examples of the things you can do by modifying your WordPress .htaccess file. For each of these tweaks, we’ll assume you already know how to access and modify your .htaccess file safely. If you have any doubts, go back and re-read the previous section just to be sure.
1. ‘Whitelist’ IP Addresses to Enable Access to Your Dashboard
Your WordPress dashboard is where all the magic happens, so it’s worth restricting access to it. Of course, the login screen will offer protection, but if you want to go even further, you can set access for (or whitelist) IP addresses you specify.
With this approach, you’ll all but eliminate the risk of attackers entering your dashboard. Here’s the code you need to add to your .htaccess file to implement this feature:
<IfModule mod_rewrite.c>
RewriteEngine on
RewriteCond %{REQUEST_URI} ^(.*)?wp-login\.php(.*)$ [OR]
RewriteCond %{REQUEST_URI} ^(.*)?wp-admin$
RewriteCond %{REMOTE_ADDR} !^IP Address #1$
RewriteCond %{REMOTE_ADDR} !^IP Address #2$
RewriteRule ^(.*)$ - [R=403,L]
</IfModule>
For additional security, this code blocks access to both your dashboard and login pages. You’ll notice there are two lines with placeholders, which is where you specify the IP addresses you want to whitelist:
RewriteCond %{REMOTE_ADDR} !^190.0.0.1$
You can whitelist practically unlimited IP addresses by adding extra lines to the code, as long as it retains the same format and they come before RewriteRule ^(.*)$ – [R=403,L]. This line tells your website to send anyone with a different IP address to an access denied page.
Of course, there are downsides to consider before implementing this feature. For example, those without static IP address may get locked out of your site until you update the .htaccess file. Two workarounds are to use a Virtual Private Network (here are few best VPN options) with a static IP address, or ask your Internet Service Provider (ISP) to assign you one. In any case, remember to save the changes to your file before closing it.
2. Stop Image Hotlinking
Unfortunately, asset theft is an inherent part of uploading media to the web. However, in some cases, some people will link directly to your images from their own sites, so your server will have to deal with those requests too. This is called ‘hotlinking’, and it could impact your own site’s performance without you realizing it.
Truth be told, hotlinking is a rare occurrence, but it’s still something you can prevent from happening. With the following code, only the whitelisted sites will be able to hotlink your images:
<IfModule mod_rewrite.c>
RewriteCond %{HTTP_REFERER} !^$
RewriteCond %{HTTP_REFERER} !^http(s)?://(www\.)?domain1.com [NC]
RewriteCond %{HTTP_REFERER} !^http(s)?://(www\.)?domain2.com [NC]
RewriteRule \.(jpg|jpeg|png|gif)$ http://yourwebsite.com/hotlink.png [NC,R,L]
</IfModule>
This snippet prevents any website except domain1 and domain2 from using images hosted on your server, and works for jpeg, png, and gif files. If someone does attempt to hotlink your images, your server will load hotlink.png instead. It’s an image you can create with a message to deter people from hotlinking in future. In practice, you can use any image you want, just make sure you enter its URL correctly.
3. Prevent People from Browsing Your Website’s Directories
When accessing your WordPress website via FTP, you can see all of the files and folders that make up and power the platform. Technically speaking, if someone knows the names of those folders, they might be able to view them through a standard web browser. They wouldn’t be able to access key files of course, but even seeing a list of them is a security breach you should work to avoid.
Fortunately, the WordPress .htaccess file can help you. Here’s the code you need to protect your directories from snooping eyes:
Options All -Indexes
Unlike every other example we’ve given so far, this line of code goes after the # END WordPress message. Also, it’s not necessary to wrap it between the <IfModule mod_rewrite.c> and </IfModule> tags. Here’s how it should appear in your .htaccess file:
# BEGIN WordPress
<IfModule mod_rewrite.c>
RewriteEngine On
RewriteBase /
RewriteRule ^index\.php$ - [L]
RewriteCond %{REQUEST_FILENAME} !-f
RewriteCond %{REQUEST_FILENAME} !-d
RewriteRule . /index.php [L]
</IfModule>

# END WordPress

Options All -Indexes
You can, of course, still tweak whatever comes before the # END WordPress line. What this code does is tell your server it shouldn’t ‘index’ or list the files within any of your directories if someone tries to peek.
How to Reset a Corrupted WordPress .htaccess File
If something goes wrong while you’re tweaking your WordPress .htaccess file, don’t panic. Near the beginning of the article, we discussed saving a backup of the file. You should hold on to that copy indefinitely, since you never know when it can come in handy. After all, if your .htaccess file becomes corrupted, you might lose access to your website entirely – as will your visitors.
Fortunately, you can replace your .htaccess file without touching your dashboard. To do so, you’ll need to return to your WordPress root folder using your FTP client, open it, and locate your .htaccess file. From this point, there are two ways to restore the file to its pristine state. The first one is to locate the copy of it you saved on your computer, using FileZilla to browse your folders until you find it:

When you do, you can simply right-click it and choose the Upload option, and the client will transfer a copy of that file over to your public_html folder. Since there’s already a .htaccess file in there, FileZilla will ask you if you want to replace it (you do). Now your website should load normally, although you’ll need to implement any changes you made to the .htaccess file again (this time more carefully!).
If you didn’t save a copy of your original .htaccess file, you can always right-click on it, within your root directory, and choose the View/Edit option. Once the file is open within your default text editor, you can go ahead and delete its contents, then add the WordPress’ default .htaccess snippet:
# BEGIN WordPress
<IfModule mod_rewrite.c>
RewriteEngine On
RewriteBase /
RewriteRule ^index\.php$ - [L]
RewriteCond %{REQUEST_FILENAME} !-f
RewriteCond %{REQUEST_FILENAME} !-d
RewriteRule . /index.php [L]
</IfModule>

# END WordPress
After pasting the snippet, save the changes to your WordPress .htaccess file, and you should be back in business!
Conclusion
Interacting with your WordPress core files can be intimidating, but it’s a necessary step if you want to master the platform. Even so, few files are as important as .htaccess when it comes to keeping your website running smoothly. A corrupted WordPress .htaccess file can render your entire site unusable, so it pays to know how to find, edit, and even repair yours.
Just to give you an idea of what you can accomplish with your WordPress .htaccess file, here are a few of the tweaks you can implement:
- Whitelist IP addresses to enable access to your dashboard.
- Stop image hotlinking.
- Prevent people from browsing your directories.
Do you have any questions about how to interact with your WordPress .htaccess file? Let’s talk about them in the comments section below!